The following guide applies to Intel NUC, but should work on every PC/laptop.
What will be needed:
– power strip with fuse and earth connection
– computer
– television
– control unit
– active speakers
– CD/DVD player
– a WiFi network within range, or a LAN cable with Internet access
– empty USB flash drive (min. 512MB capacity)
– a second computer to prepare the installer.
If someone is interested how to install RAM/SSD/WIFI into Intel NUC, it's easy to find videos on network like here: https://www.youtube.com/watch?v=_-5B7298_Lk.
It is important, in my opinion, that there should be a power strip between the mains socket and the devices equipped with a ground line and a fuse. It is a good idea to make sure that the power supplies do not cling to each other because they can be hot during operation.
It is worth to plan the layout of the elements beforehand in order to select the appropriate length of the cables, and to predict how we will use the device (Intel NUC can be placed on the back of the TV if it does not hang on the wall).
The set I use has active monitors, i. e. speakers with built-in own amplifier. You can use other speakers (e. g. computer speakers) if they are equipped with their own power supply. However, if you already have loudspeakers that do not have own amplifier, you will either need to upgrade or add an amplifier to your set.
The next steps forward:
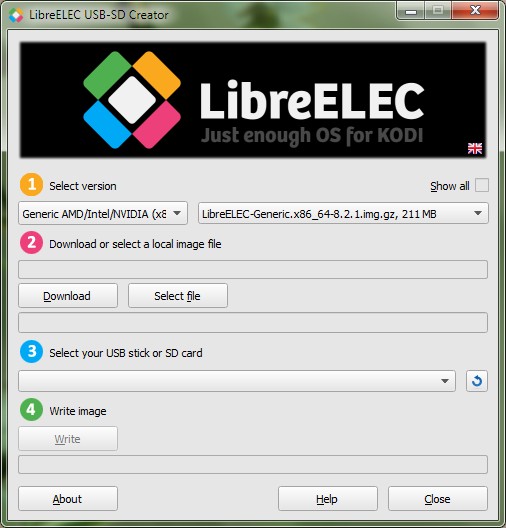
1 – Leave the version unchanged.
2 – Press Download button, a dialog box will be displayed, where you select folder to save the downloaded system image (it has about 230MB). You will see how much information has been downloaded, and there will be automatically filled in the field with file location.
3 – Select the previously prepared pendrive here.
4 – When the file download is complete, press Write button. The program will prepare files.
When this process is complete, close the program and safely pull out the USB flash drive (right mouse button, for Windows).
Here is a film showing the process of creating the installer on USB: https://youtu.be/JF-wtjYCrCs?t=16s.